L is the twelfth letter of the letter set, and recurrence is likely the most generally involved letter in words. It is likewise one of the most miniature and demanding letters to realize while beginning to figure out how to compose. The l sound is additionally one of the most straightforward to articulate, making L a generally speaking loosened-up letter! Even though it might not be challenging to compose and articulate, that doesn’t mean you can’t do cool things with it. In this aide, we’ll tell you how to revitalize this straightforward letter with a tomfoolery bubble impact. We’ll walk you through 6 tomfoolery and simple tasks that will tell you the best way to make a genuinely excellent rendition of this letter. Then, we’ll review a few additional plans to make your drawing much cooler. We should begin with the initial step to make an air pocket letter L! Nursery Rhymes
Stage 1:
The most effective method to draw your air pocket L stage 1
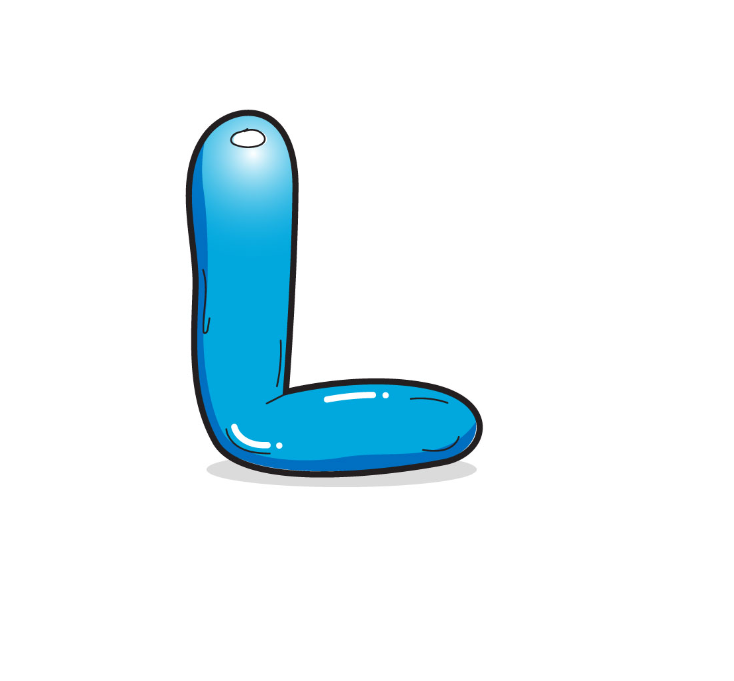
In the prologue to this aide, we clarified that L is one of the most straightforward letters to learn for composing. The lowercase form is an upward line, and the capitalized rendition adds an even part beneath it. Everything is very straightforward. However, this air pocket letter rendition will make things more perplexing. That said, we will save fundamental things for this initial step. You should define a straightforward vertical boundary. It looks pretty straight in our model picture, yet you don’t need to stress over it being completely straight. Rather than utilizing a ruler, draw freehand and don’t stress over it being somewhat wavy. It shouldn’t be straight on the grounds that the thought is to make it seem like an air pocket. You’ll see later in the aide why we want this to be this way as the plan comes to fruition. When this line is drawn, we can then continue toward stage 2.
Stage 2 :
Instructions to draw your air pocket L stage 2
The line we attracted in the initial step of the aide will be within the edge of the principal section of the letter. Then, we will draw the highest point of this section part. This part should be as simple as stage one, if not more straightforward! You should draw a bent part over the line. This will reach out to one side, shaping a curve. If you can define the past boundary and this one of every one movement, that would be great, yet you can part it in two, assuming you view that as more straightforward. Sit back and relax, assuming that you want to work on defining these boundaries since you will arrive! When this section top is drawn, we can attract different segment pieces to the accompanying advances, so we should proceed.
Stage 3:
The most effective method to draw your discourse bubble, stage 3
As guaranteed, we’ll attract the remainder of the principal section of your air pocket letter L during this step. This will be achieved with another wavy vertical line. Once more, it’s OK if your hand wobbles a bit and makes it wave. You will find in our reference picture that there is a genuinely articulated drop in line. This will assist with making the letter look considerably more like an air pocket or inflatable, which is why we don’t hold back lines. At the point when you have defined this last upward boundary, there will be a space left at the foundation of the letter. We will fill this space very soon when we finish the diagram for the subsequent stage in the aide! We will get this plan going if you are content with what it looks like.
Stage 4:
The most effective method to draw your discourse bubble, stage 4
It is the right time to complete the arrangement to set up a few tomfoolery additional subtleties for the following stage. Looking at the letter L, you will see a straight base. This base is the very thing we’ll attract this step, including another long, bent shape. This base will begin and end where space was left in the past part. As usual, you can leave the line alone to be completely straight. However, it should be genuinely level as it is the letter’s premise. With this line added, you will see that the blueprint of this air pocket letter is currently finished! We need to be more precisely wrapped up. The subsequent stage will permit you to add a tomfoolery additional subtleties to complete the air pocket impact; then, at that point, we’ll add a few varieties in the last step.
Stage 5:
The framework of your L-formed drawing is finished. However, it has yet to be an air pocket. This is the very thing that we will address in this step by adding.
also read: Draw Your Bubble Letter L